Step-by-Step Guide to Use KeaBuilder’s Builder
Step 1: Open the Funnel Builder
When you enter the Funnel Builder in KeaBuilder, you'll land on a blank canvas — this is where you’ll build your funnel. The canvas already includes a default Section and Row to get you started.
Everything you build (text, images, buttons, etc.) will be placed inside Sections > Rows > Columns > Elements.
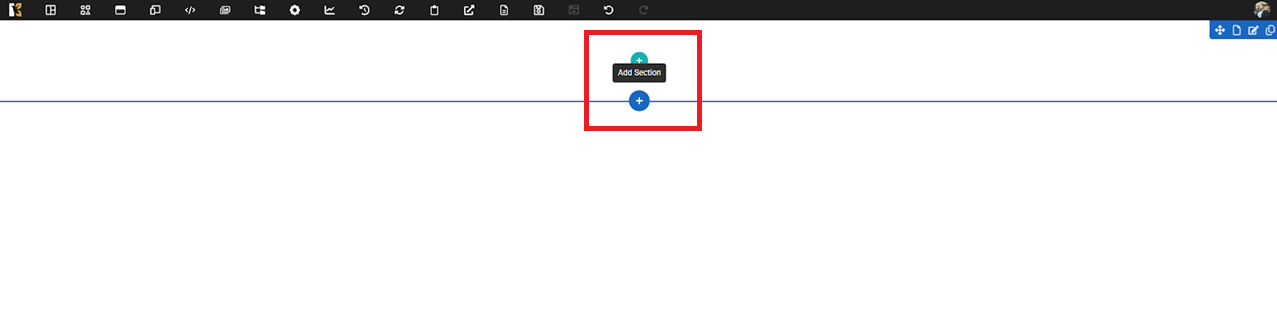

👉 Think of a Section as a big container, a Row as a horizontal line inside that container, and Columns as spaces within rows. Elements are the content like images or text.
Step 2: Use the Top Menu to Add and Customize Layout
At the top of the page, you'll see a menu with different tools. Click on Layout to begin shaping your funnel’s structure.
Here’s what’s inside the Layout tab:
- Templates: Ready-made funnel designs. Choose one to save time.
- Sections: Add new sections (like a hero section, about us, etc.).
- Rows: Add rows inside a section to organize content.
- Headers & Footers: Add common sections that appear on all pages.

✅ Tip: Start by dragging a Section, then add a Row inside it, and finally drop Elements inside Columns.
Step 3: Add Elements to Bring Your Funnel to Life
Click on the Elements menu to start adding content blocks. Some of the most used elements include:
- Heading – Add a bold title.
- Text – Add paragraph content or descriptions.
- Image – Upload or select images for visual appeal.
- Button – Create call-to-action buttons like “Buy Now” or “Learn More”.
- Divider – Add horizontal lines to break up content.
- Form – Collect user information (email, name, etc.).
- Video – Embed a video to educate or engage your visitors.
- Menu – Add navigation links.

Drag and drop any element where you want it. You can resize, move, or delete them easily.
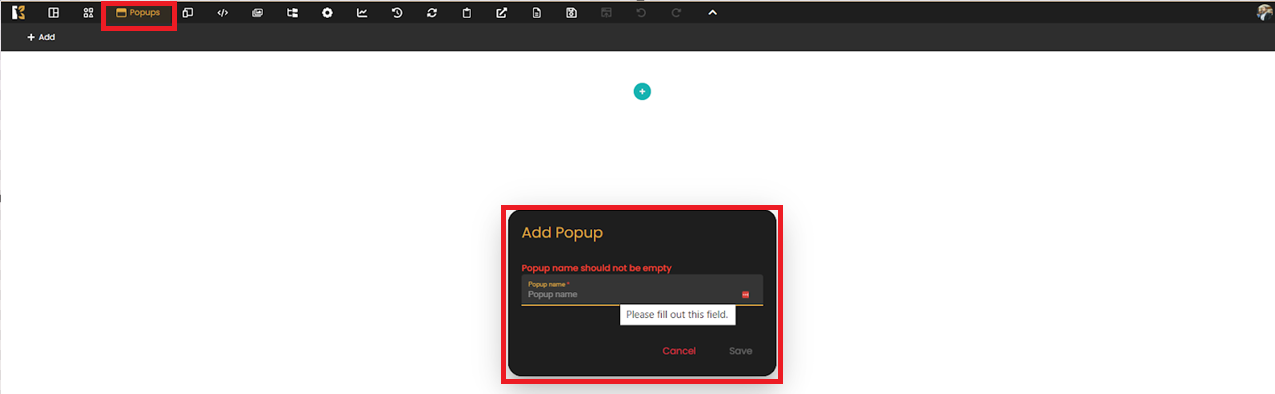
Step 4: Create Popups
From the Popups menu, you can add popup windows that appear based on actions like clicking a button or exiting the page.
Examples of popup uses:
- Collecting emails
- Showing limited-time offers
- Confirming actions
You can design popups just like pages — with rows, columns, and elements.
Step 5: Design for All Devices
Click on the Devices option to preview and edit your design for:
- Desktop
- Tablet
- Mobile

👉 Adjust padding, font size, spacing, and visibility to ensure your funnel looks great on every screen.
✅ Tip: Always check and fine-tune your funnel for mobile users — they often make up the majority of visitors.
Step 6: Add Tracking Code (Advanced)
Under Tracking Code, you can paste code snippets like:
- Google Analytics
- Facebook Pixel
- Custom JavaScript
Choose whether to place the code in:
- The Header (loads first)
- The Footer (loads last)
👉 This is optional but important if you’re running ads or tracking performance.
Step 7: Use Wireframe View
Click Wireframe to switch to a simplified layout view. This hides images, colors, and styling — letting you focus on:
- Structure
- Section/row/column hierarchy
- Placement of elements

✅ Use this mode for clean planning and faster editing.
Step 8: Configure Page Settings
Click on Page Settings to set up important design and background details. Options include:
- Page Name: Label your page (e.g., “Home” or “Thank You Page”).
- Path: Set the page URL (e.g.,
/thank-you). - Background: Choose color, gradient, or image.
- Spacing: Set padding inside sections.
- Borders: Customize the edge style of your content blocks.

✅ Tip: Use background images or gradients for a more visually engaging funnel.
Step 9: Add SEO Info
Under the SEO tab, you can optimize your page for search engines. Add:
- Page Title – What appears on the browser tab and in Google results.
- Author
- Meta Keywords – Words that describe your page.
- Meta Description – A short summary for search engines.
- SEO Image Link – Image that shows when shared on social media.
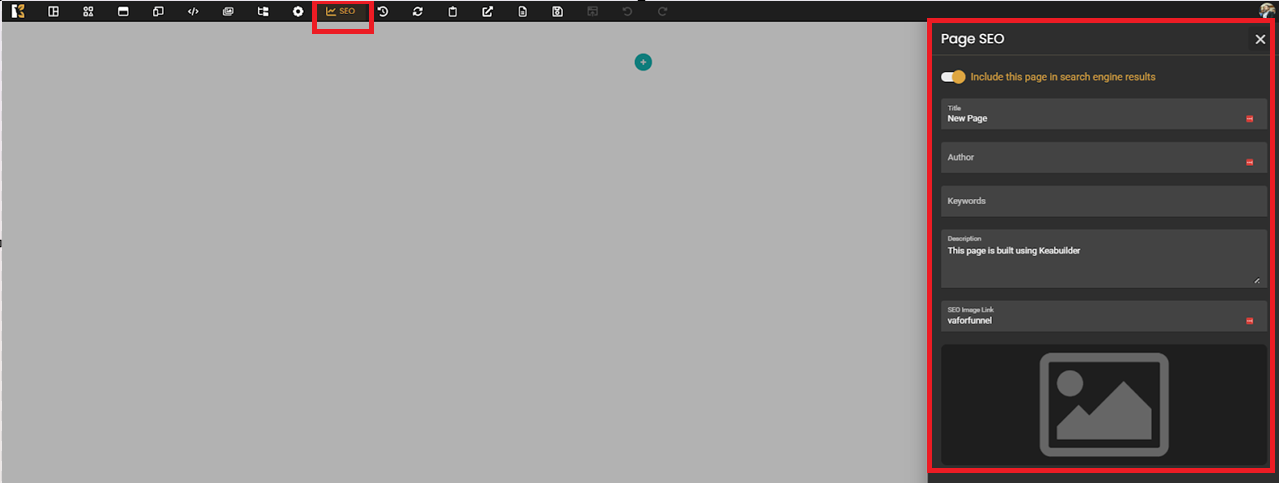
✅ Even if you’re not doing SEO, adding a page title and description improves professionalism.
Step 10: Manage Versions
Click on Versions to:
- View and recover previous saved versions of your page.
- Compare older designs if something breaks or needs restoring.

✅ Think of it like a time machine — never worry about losing your work!
Step 11: Set Auto-Save Preferences
In the Auto-Save settings, choose how often your work is saved:
- Every 1 second
- Every 30 seconds
- Every 1 minute
- Every 2 minutes
- Or turn Auto-Save Off for manual saving only

✅ Keep auto-save ON to avoid losing changes if your browser crashes.
Step 12: Preview Your Design
Click Preview to see a live simulation of your funnel. This lets you:
- View how everything looks in real-time.
- Test links, buttons, forms, etc.

✅ Always preview before saving or publishing to catch any layout issues.
Step 13: Save, Save as Template, or Publish
You now have three options:
- Save – Store your current progress.
- Save As Template – Reuse this design in future funnels.
- Publish – Make the page live on the internet.


✅ If your page is ready, hit Publish. If it’s a rough draft or reusable layout, save it as a Template.
Step 14: Use Undo, Redo & Close
In case of mistakes:
- Undo – Go back one step.
- Redo – Move forward if you undo too far.

Final Thoughts
With KeaBuilder’s Funnel Builder, you don’t need to be a coder or designer. Just follow these steps one by one and you’ll have a professional funnel ready to go — whether for lead generation, sales, webinars, or thank-you pages.